
HOW TO SETUP RAID 1
HOW TO SETUP RAID 1
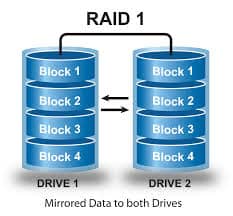
RAID Level 1 can also be referred to as a mirrored array of hard drives. Mirroring is implemented when fault tolerance is desired. Fault tolerance is the ability of the data contained in the array to remain intact if one of the drives fails. In a mirrored array, all of the data is duplicated across 2 or more hard drives. The general idea: All of one’s important data would be stored on a mirrored array, and if one of the hard drives dies (which should be assumed, they die often), the data is still accessible / usable from the other drive. During a state of “failed redundancy”, the volume is now only one hard disk, and it would be smart to replace the failed disk promptly to rebuild the array. Common categories you may want to store on a redundant (same thing as “fault tolerant”) array: years of pictures, videos, documents, music, and hard-to-replace software install packages.
How to set up a Mirrored Array in Windows 7
- Install two hard drives. For my tests, I installed two WD 320 GB RE2 drives. Visit Buildegg’s Component section to see the best hard drives to buy.
- Boot up Windows, hit the start button, and in the search box type either “Create and” or “Disk man”, and click “Create and Formant Hard Disk Partitions”. This program is also accessible through Control Panel -> System and Security -> Administrative Tools -> Create and Formant Hard Disk Partitions.
- If these drives have never been used, it may ask you to initialize them, in which case you’ll most likely be using “MBR”.
- If the new disks do not say “Unallocated” in them, then delete their volumes by right-clicking on each disk’s volume and going to “Delete Volume…”
- Now let’s create the RAID: right-click on one of the disk (doesn’t matter which), and go to “New Mirror Volume…”
- A series of prompts will ask you about some details of your new mirrored volume (array), like which disks are to be included, size of the volume, drive letter assignment, and volume name. In my example, I chose Disk 1 and Disk 2 (Disk 0 being my original disk with the OS on it), the full size available (its default), drive letter M, quick format, and “WinMirror” as the volume name.
That’s it! Transfer all of your important files to your new “drive” and have a little peace of mind. Here’s an idea… map all of your Windows libraries (those default ones, Documents, Pictures, etc.) to your mirrored array, and you can upgrade hardware / format and reinstall windows all day long and not have to worry about your data.
What happens when a hard drive fails? How do you recover?
The whole point for setting up a mirrored array is anticipating the time when one of the hard drives fails and dies. There are two points in time where failure might happen: while the computer is on and you’re using it, or somewhere between the computer being shut off and turned back on. I simulated a drive failure while using the mirrored volume and I was able to continue working on files; accessing them and saving them. What is interesting is that Windows will not inform you that the array in an unhealthy state (at least, it never told me…); you won’t know until Windows is restarted. When you boot your system back up after one of the drives has failed, you will notice your mirrored volume missing (when you go to access something from it). Fear not, your data is still there, just open “Create and Format Disk Partitions” and manage the situation.
Inside Window’s disk manager you’ll find the still functioning disk, and it will be flagged with “Failed Redundancy”, of course meaning that the mirrored volume is no longer redundant because the other drive failed. In the most common situation I can imagine for most of us, you will need access to your files, and it may be a few days (or weeks) before you can replace the failed hard drive.
- First let’s gain access to our files. Right-click on the dynamic disks that is still functioning and go to “Remove Mirror…”
- Select and remove the missing (failed) disk. In my example, Disk 1 was the disk that failed, so I’m keeping Disk 2 and removing Disk 1 (which is labeled just as “Missing”).
- Now you’re left with a “Healthy” simple volume from which you can continue to use all of your data.
- Get a replacement hard drive so you can rebuild the mirror. NOTE: Most hard drives now have 3-5 year warranties, and all you have to do is go to the manufacturer’s website, fill out the RMA, and send in the defective drive.
- Fast forward to the time that you install a replacement hard drive (this may be an hour later, or weeks later).
- Open the Windows disk manager “Create and Format Disk Partitions” and make sure that the new drive is initialized and is unallocated.
- Right-click on the disk that survived (the one from the original mirror), and go to “Add Mirror…”. Follow the prompts and add the new drive.
- Now you have a new RAID 1, Mirrored Volume. You’ll notice that both drives in the array say “Resynching”, which is pretty much the one drive being copied to the other. This process may take the better part of a day if you have large drives, but that’s okay because it’s being done in the background — you don’t have to worry about it.
When raid fails, it’s important to consult a raid recovery expert before attempting to do it on your own, since this will increase your chances of successfully retaining your data.