Month: March 2017

HOW TO RECOVER RAID – THINGS TO CONSIDER BEFORE RECOVERING RAID

HOW TO RECOVER RAID

RAID (redundant array of independent disks; originally redundant array of inexpensive disks) provides a way of storing the same data in different places (thus, redundantly) on multiple hard disks (though not all RAID levels provide redundancy).

By placing data on multiple disks, input/output (I/O) operations can overlap in a balanced way, improving performance. Since multiple disks increase the mean time between failures (MTBF), storing data redundantly also increases fault tolerance.

However this doesn’t mean that the RAID disks are fully fault tolerant, meaning that there is a possibility of the drives crashing. You may need to perform some data recovery incase this happens for you to get back your data

Before you can start any recovery on RAID, first consider the following factors:

  • If one of the member disks of RAID 5, RAID 6, RAID 5E or RAID 0+1 is physically damaged (produces unusual sounds, e.g. clicking or repeated spin-up and spin-down sounds), don’t use this disk for recovery.
  • If you cannot avoid using a physically damaged disk, say, for RAID 0 recovery, try to create the disk image file
  • If you have a hardware RAID, you should
  • Clearly label the member disks, the cables, and the controller ports, so that the original setup can be reassembled if need be.
  • Disconnect the array member disks from the RAID controller and then attach them as separate/standalone disks to a non-RAID controller. You need to access the disks separately to be able to reconstruct RAID parameters.
  • If you plan to recover data once the RAID parameters are restored, prepare a free disk space equal to the amount of data which you are going to recover.

Once these factors are put into consideration, you can now begin recovery.

If this doesn’t work for your case or you aren’t willing to take the risk recovering on your own, you can always contact the Data Recovery Experts for professional RAID data recovery.

HOW TO SETUP RAID 5

HOW TO SETUP RAID 5

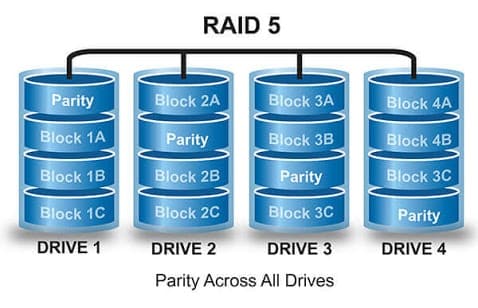
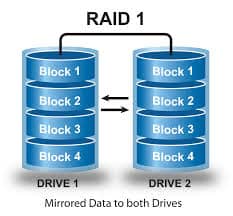
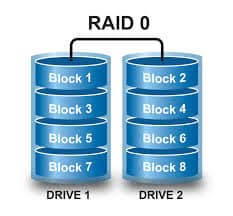
Of all the RAID levels that consumers are likely to use on their home systems, RAID 5 is one of the more exotic choices. While RAID 0 and 1 are pretty straightforward, RAID 5 is a little more complex. As we discussed in earlier articles, RAID 0 stripes data across an array of drives, making reads and writes faster, while also sacrificing redundancy. RAID 1 does the opposite, writing identical data across every drive in the array, creating a redundancy in the event of failure. RAID 5 is somewhere in between. Like RAID 0, RAID 5 stripes data across an array of drives. However, one of the drives is reserved as the redundant copy of the piece of data. As each block of data is written, the stripes and redundant copy rotate places, so that no single drive fills up with redundant copies (this is called distributed parity). For this to work, RAID 5 requires a minimum of three drives.

When a drive in a RAID 5 array fails, the data can be located somewhere else in the array. If failure occurred on a drive that held a striped copy, the entirety of the data can be found on the drive that holds the parity copy. If the parity is missing, you still have a copy of the data striped across the other drives. On the flip side, if you lose more than one drive, you’ll lose the entire array because parity is distributed across all the drives.

In terms of performance, read operations will be similar to that of RAID 0, as the striped data can be read from several drives at one. Write operations, however, are more like RAID 1, since the parity data is written to only one drive.

Drive space is also pooled, but less so than in RAID 0. In RAID 5, it works a bit differently. Due to the way parity works, if you have three drives, the available space will be equal to a RAID 0 array with two drives. In our examples, we used three 120GB SSDs, which resulted in arrays with 240GB of space.

If you want install an OS on top of a RAID array, RAID 5 will work fairly well, so long as you’re not trying to use it atop an array of multi-terabyte spinning drives. RAID 5 offers more resiliency than RAID 0, as well as significant gains in read operations for loading programs and games.

By now you already know that it’s always best to use drives of identical make, model, and capacity when constructing a RAID array. Even if you’re forced to use different makes and models (as we were in our examples), you have to make sure that the drive capacities are identical. Mixing drives will at best result in an array that will perform as if each drive were the slowest one.

When connecting your drives for use in RAID, be sure to use the same interface for the drive. If two drives in your array are using SATA 6Gbps, use the same interface for every other drive you intend to add to the array.

It’s also a good idea to make sure all of the drives in your array are using the latest firmware. Firmware fixes can result in better speeds and fix potential bugs that can wreak havoc on your data.

CREATING ON WINDOWS

Creating a RAID 5 array in Windows is just as easy as creating RAID 0 and 1 arrays. It’s important to remember Microsoft uses the name “Storage Spaces” instead of RAID, but the function is pretty much the same. To start, hit Win + S and search for “Storage spaces” and launch the utility. Next, click “create a new pool and storage space.” You’ll be prompted for administrator access. Click yes to continue. You’ll see a window showing all of the unformatted disks that can be used. Select all the disks you want in the array and click “Create pool.” You’ll have to select at least three to be able to create a RAID 5 array. Next, give the pool a name and drive letter. The name will appear as the drive label. Select NTFS as the file system. For Resiliency type, select “Parity,” which is the equivalent to RAID 5? When you’re ready, click Create storage space to create the array. If you want to remove a RAID array for any reason, simply click Delete next to the storage space you want to remove. To remove the pool, remove all of the storage spaces in it first.

CREATING ON LINUX

Creating a software RAID 5 array in Linux takes only two terminal commands. In Linux, the program mdadm (we like to pronounce it “madam”) is what we’ll use to set up the array.

First things first, you need to get the RAID software. You’ll need to download and install mdadm from your software repository. It’s pretty common, and is included in most software repos. In Ubuntu, type the following command: sudo apt-get install mdadm

The command will install mdadm for you, along with a dependency called Postfix. Postfix is an SMTP service that sends emails. The reason it’s included is because if a drive fails or something else happens to your array, the system can alert you with an email. That’s great for IT administrators, but Postfix is a PITA to administer. In many cases, you can just set the program to use no configuration if you like. If you do take the time to set it up, it can give you early warning when drives fail.

Once mdadm is all set up, all you need to do is use the following command: sudo mdadm –create /dev/mdX –level=5 –raid-devices=[number of drives (3 or more)] [drive name] [drive name] [drive name] [etc]

The above command will vary based on the size of your array, and how you’d like to name it. RAID devices are generally named /dev/md X where X is the index of the array. Drive names can be any valid Linux device path, e.g., /dev/sda or /dev/disk/by-uuid/[UUID] .

If you’re not sure how Linux has identified your drives, you can use lsblk to identify them:

lsblk -o name,model,mountpoint,size

Once you create your array, you’ll have to wait while the drives synchronize, which may take several minutes.

You can also create RAID arrays in Linux using the GNOME disk utility. In Ubuntu, search for “Disks” and open the utility. On the left side of the window, click the checkbox above the list of drives. Then, select the drives you want to use to create an array and click Create RAID.

HOW TO SETUP RAID 1

HOW TO SETUP RAID 1

RAID Level 1 can also be referred to as a mirrored array of hard drives. Mirroring is implemented when fault tolerance is desired. Fault tolerance is the ability of the data contained in the array to remain intact if one of the drives fails. In a mirrored array, all of the data is duplicated across 2 or more hard drives. The general idea: All of one’s important data would be stored on a mirrored array, and if one of the hard drives dies (which should be assumed, they die often), the data is still accessible / usable from the other drive. During a state of “failed redundancy”, the volume is now only one hard disk, and it would be smart to replace the failed disk promptly to rebuild the array. Common categories you may want to store on a redundant (same thing as “fault tolerant”) array: years of pictures, videos, documents, music, and hard-to-replace software install packages.

How to set up a Mirrored Array in Windows 7

  1. Install two hard drives. For my tests, I installed two WD 320 GB RE2 drives. Visit Buildegg’s Component section to see the best hard drives to buy.
  2. Boot up Windows, hit the start button, and in the search box type either “Create and” or “Disk man”, and click “Create and Formant Hard Disk Partitions”. This program is also accessible through Control Panel -> System and Security -> Administrative Tools -> Create and Formant Hard Disk Partitions.
  3. If these drives have never been used, it may ask you to initialize them, in which case you’ll most likely be using “MBR”.
  4. If the new disks do not say “Unallocated” in them, then delete their volumes by right-clicking on each disk’s volume and going to “Delete Volume…”
  5. Now let’s create the RAID: right-click on one of the disk (doesn’t matter which), and go to “New Mirror Volume…”
  6. A series of prompts will ask you about some details of your new mirrored volume (array), like which disks are to be included, size of the volume, drive letter assignment, and volume name. In my example, I chose Disk 1 and Disk 2 (Disk 0 being my original disk with the OS on it), the full size available (its default), drive letter M, quick format, and “WinMirror” as the volume name.

That’s it! Transfer all of your important files to your new “drive” and have a little peace of mind. Here’s an idea… map all of your Windows libraries (those default ones, Documents, Pictures, etc.) to your mirrored array, and you can upgrade hardware / format and reinstall windows all day long and not have to worry about your data.


What happens when a hard drive fails? How do you recover?

The whole point for setting up a mirrored array is anticipating the time when one of the hard drives fails and dies. There are two points in time where failure might happen: while the computer is on and you’re using it, or somewhere between the computer being shut off and turned back on. I simulated a drive failure while using the mirrored volume and I was able to continue working on files; accessing them and saving them. What is interesting is that Windows will not inform you that the array in an unhealthy state (at least, it never told me…); you won’t know until Windows is restarted. When you boot your system back up after one of the drives has failed, you will notice your mirrored volume missing (when you go to access something from it). Fear not, your data is still there, just open “Create and Format Disk Partitions” and manage the situation.

Inside Window’s disk manager you’ll find the still functioning disk, and it will be flagged with “Failed Redundancy”, of course meaning that the mirrored volume is no longer redundant because the other drive failed. In the most common situation I can imagine for most of us, you will need access to your files, and it may be a few days (or weeks) before you can replace the failed hard drive.

  1. First let’s gain access to our files. Right-click on the dynamic disks that is still functioning and go to “Remove Mirror…”
  2. Select and remove the missing (failed) disk. In my example, Disk 1 was the disk that failed, so I’m keeping Disk 2 and removing Disk 1 (which is labeled just as “Missing”).
  3. Now you’re left with a “Healthy” simple volume from which you can continue to use all of your data.
  4. Get a replacement hard drive so you can rebuild the mirror. NOTE: Most hard drives now have 3-5 year warranties, and all you have to do is go to the manufacturer’s website, fill out the RMA, and send in the defective drive.
  5. Fast forward to the time that you install a replacement hard drive (this may be an hour later, or weeks later).
  6. Open the Windows disk manager “Create and Format Disk Partitions” and make sure that the new drive is initialized and is unallocated.
  7. Right-click on the disk that survived (the one from the original mirror), and go to “Add Mirror…”. Follow the prompts and add the new drive.
  8. Now you have a new RAID 1, Mirrored Volume. You’ll notice that both drives in the array say “Resynching”, which is pretty much the one drive being copied to the other. This process may take the better part of a day if you have large drives, but that’s okay because it’s being done in the background — you don’t have to worry about it.

When raid fails, it’s important to consult a raid recovery expert before attempting to do it on your own, since this will increase your chances of successfully retaining your data.

HOW TO SETUP RAID 0

HOW TO SETUP RAID 0

RAID has several “levels” that use drives in different ways. Level 0 (RAID 0) spreads or “stripes” data between two or more drives. The problem with striping data across drives is that when things go wrong, they go really wrong: If a single hard drive in a RAID 0 array fails and cannot be recovered, the entire RAID array is lost. On the plus side, RAID 0 combines the drives into a single larger logical drive with a capacity that is the sum of all the drives in the array.

There are three ways to implement RAID: hardware, software, and Fake RAID. Hardware RAID is faster, but it’s also more expensive due to the need for specialized hardware. Software and Fake RAID use the CPU in lieu of a dedicated RAID chip.

Creating a software RAID array in operating system software is the easiest way to go. Windows 8 comes with everything you need to use software RAID, while the Linux package “mdadm” is listed in most standard repositories.

The problem with software RAID is that it only exists in the OS it was created in. Linux can’t see a RAID array created in Windows and vice versa. If you’re dual booting both Linux and Windows and need access to the array from both operating systems, use Fake RAID. Otherwise, stick to software.

In this article we’ll focus on Software RAID:

To ensure the best RAID performance, use identical drives with the same firmware. Mixing drive makes and models may work, but will result in faster drives being slowed down to match the slowest drive in the array. Don’t mix SSDs and mechanical drives in a RAID array; the SSD is faster on its own.

RAID 0 doesn’t protect you from drive failure, so use new drives whenever possible. When connecting your drives, make sure they’re all using the same SATA version as well.

Before a drive can be used in a RAID array, it must be clear of file systems and partitions. If you’re using old drives, make sure you get everything of value off of them first. You can remove any partitions with Disk Management on Windows or “gparted” on Linux. If you’re using Fake RAID, the motherboard’s RAID utility should warn you before it wipes partition tables and the file systems on them.

In your operating system, you’ll need to have elevated permissions to create a RAID array. For Windows, you’ll need to be an Administrator. In Linux, you’ll need either the root password or sudo access.


If you want to use Fake RAID, make sure your motherboard supports it. Be warned though: Installing an OS on top of a RAID 0 array can be really risky if your system data is critical.

CREATING RAID ON WINDOWS

Creating a software RAID 0 array on Windows is really easy. The thing is, Microsoft doesn’t call it RAID in Windows 8, opting for “storage spaces” and “storage pools” instead.

Hit Win + S and search for “storage spaces” and open the utility. Next, click Create a new pool and storage space. You’ll be prompted for administrator access. Click Yes to continue.

Windows 8’s built-in RAID software goes by the name “Storage Spaces.”

A window showing all the unformatted disks that can be used will pop up on the screen. Select all the disks you want in the array and click Create pool.

Next, give the pool a name and drive letter. The name will appear as the drive label. Select NTFS as the file system. For Resiliency type, select Simple (no resiliency. This is the equivalent to RAID0.When you’re ready, click Create storage space to create the array.

While a simple storage space technically only requires one hard disk, you need at least two for it to be a true RAID setup.

If you want to remove a RAID array for any reason, simply click Delete next to the storage space you want to remove. To remove the pool, remove all of the storage spaces in it first.

When you’re done, you’ll be able to manage your storage spaces, check capacity, and monitor usage.

CREATING RAID ON LINUX

Creating a software RAID in Linux is faster than Windows because it only requires a couple of console commands. First, you need to download and install mdadm from your package manager. In Ubuntu, use aptitude to install the program:

sudo apt-get install mdadm

Once mdadm is installed, you can create your array by typing the following command as root or using sudo:

mdadm –create /dev/mdX –level=0 –raid-devices=[number of drives] [drive name] [drive name] [etc]

The above command will vary based on the size of your array, and how you’d like to name it. RAID devices are generally named /dev/mdX where X is the index of the array. Drive names must be valid Linux device paths, e.g., /dev/sda or /dev/disk/by-uuid/[UUID] . In our example, we used the following:

mdadm –create /dev/md0 –level=0 –raid-devices=2 /dev/sda /dev/sdb

To take apart the RAID array, use the following commands:

umount -l /dev/mdX

mdadm –stop /dev/mdX

sudo mdadm –zero-superblock /dev/sdX

sudo mdadm –zero-superblock /dev/sdY

Contact Data Recovery Experts in case of failure

HOW TO RECOVER QUICKBOOKS ADMIN PASSWORD

HOW TO RECOVER QUICKBOOKS ADMIN PASSWORD

When using QuickBooks Desktop, you’re always signed in as a specific user. QuickBooks normally sets up an Admin account first time you install and set it up. Any other user is normally set up by the Admin. Security updates and other unforeseen circumstances may lead you to reset your password. This article guides you on how to reset your QuickBooks desktop password.

  1. If you know your Admin password and want to change it:
  • With your company file open, choose Company > Set Up Users and Passwords > Change Your Password.
  • In the Current Password field, enter your current admin password.
  • In the New Password field and the Confirm New Password field, enter your new password.

Note: If you want to leave your password blank, you must choose <select> in the Challenge Question field and the Answer field must be empty.

  • Click Ok.
  1. If you forgot your QuickBooks Admin password need to reset:

If you’ve forgotten or lost your admin password, Intuit recommends 2 solutions for this problem. The first solution may solve your problem, or you may need to try both to resolve the issue. For best results, perform the solutions in the order shown.

  1. Reset your Admin password using your challenge question
  • In the QuickBooks Desktop login screen, click I forgot my password
  • Answer the security question and click OK.
  • Click Close when you see this message:

“Your password and challenge answer and question have been removed, and your company file is no longer password-protected. When you close this window, you will be asked to create your new password and select and answer your challenge question.”

  • The Change QuickBooks Password window opens. Enter a new password and new challenge question
  • Click OK. Your will file open
  1. Reset your admin password using a reset code (access token)

Go to the QuickBooks Automated Password Reset tool to reset your Admin password.

  • From the QuickBooks version, select your version of QuickBooks Desktop.

Important: The version of QuickBooks you last opened your company file with must be installed on the computer you are using to remove and reset the password.

  • Fill in your QuickBooks license number and business info then click Submit. NOTE: All information entered must match the information in our system including email address. The email that includes the access token will be sent ONLY to that same address.
  • Accept the license and click the Download button.
  • On the next screen, click the Download Now link. IMPORTANT: Make sure if it asks you to Run or Save, you choose Save and save it to your Desktop.
  • Double-click the QBPasswordReset.exe file that was downloaded to open the tool.
  • Enter the token number you received via email into the Token Number field.
  • Select your QuickBooks version in the QuickBooks Products drop-down menu
  • Click the Browse for Company File button and select the company file that you want to reset the password on.

Note: if you are resetting the password for an Accountant’s Copy working file (.QBA), you will need to type *.* in the file name box and press Enter. This will allow you to see and select .QBA files.

  • Enter your new password in the New Password and Confirm Password fields.
  • Click the Reset Password button

You should now be able to open QuickBooks and login to your company file using the new password you just set. The QuickBooks Password Reset.exe file cannot be used again without completing the verification form again. To reset the password on another QuickBooks company file, you must return to the link in step 1 and complete the process again.

If you are unable to change or reset your QuickBooks following the above outlined steps, you can contact the Data Recovery Experts for advanced and professional assistance.

HOW TO RECOVER DELETED FILES FROM THE RECYCLE BIN

HOW TO RECOVER DELETED FILES FROM THE RECYCLE BIN

The main reason why this tool is called recycle bin and not a shredder is that you can easily restore the files in it as long as you have not emptied it yet. Restoring deleted files from the Recycle Bin in Windows should only take a few minutes but it depends mostly on how quickly you can find the files you want to restore as well as how large they are. For you to restore these files you need to follow the following steps:

  1. Open the Recycle Bin by double-clicking or double-tapping on its icon on the Desktop.
  2. Locate and then select whatever file(s) and/or folder(s) you need to restore.
  3. Original Location of the files you’re restoring so you know where they’ll end up.
  4. Right-click or tap-and-hold on the selection and then choose Restore.
  5. Wait while Recycle Bin restores the deleted files.

The time this takes depends mostly on how many files you’re restoring and how large they are altogether but your computer speed is a factor here too.

  1. Check that the files and folders you restored are in the location(s) that were shown to you back in Step 3.

In case you can’t find the recycle bin easily, you can show it or unhide it by following these simple steps:

  • Windows 10: Open Desktop Icon Settings via Settings -> Personalization -> Themes -> Desktop icon settings. Check Recycle Bin and then tap or click OK.
  • Windows 8: Search for desktop icon settings and then choose Show or hide common icons on the desktop from the results. Check Recycle Bin and then tap or click OK.
  • Windows 7 & Vista: Right-click anywhere on the Desktop and choose Personalize. Click the Change desktop icons link on the left. Check Recycle Bin and then click OK.
  • Windows XP: There is no built-in ability to hide the Recycle Bin in Windows XP but it is possible via a program called Tweak UI. If you’re using Windows XP but don’t see Recycle Bin, it’s probably because this program was used to hide it, which you can also use to “unhide” it.

Note:  If you can’t see the file you’re looking for in the recycle bin, that means you permanently deleted it or you have already emptied the recycle bin. In that case you can consult the Data Recovery Experts for more advanced and professional data recovery services.

Scroll to top