HOW TO SETUP RAID 5
HOW TO SETUP RAID 5
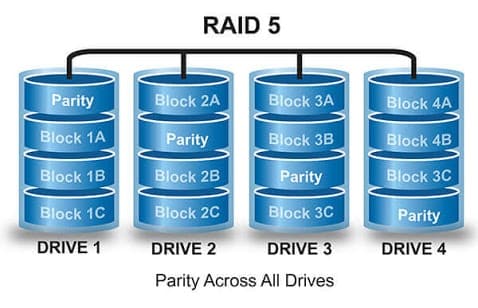
Of all the RAID levels that consumers are likely to use on their home systems, RAID 5 is one of the more exotic choices. While RAID 0 and 1 are pretty straightforward, RAID 5 is a little more complex. As we discussed in earlier articles, RAID 0 stripes data across an array of drives, making reads and writes faster, while also sacrificing redundancy. RAID 1 does the opposite, writing identical data across every drive in the array, creating a redundancy in the event of failure. RAID 5 is somewhere in between. Like RAID 0, RAID 5 stripes data across an array of drives. However, one of the drives is reserved as the redundant copy of the piece of data. As each block of data is written, the stripes and redundant copy rotate places, so that no single drive fills up with redundant copies (this is called distributed parity). For this to work, RAID 5 requires a minimum of three drives.
When a drive in a RAID 5 array fails, the data can be located somewhere else in the array. If failure occurred on a drive that held a striped copy, the entirety of the data can be found on the drive that holds the parity copy. If the parity is missing, you still have a copy of the data striped across the other drives. On the flip side, if you lose more than one drive, you’ll lose the entire array because parity is distributed across all the drives.
In terms of performance, read operations will be similar to that of RAID 0, as the striped data can be read from several drives at one. Write operations, however, are more like RAID 1, since the parity data is written to only one drive.
Drive space is also pooled, but less so than in RAID 0. In RAID 5, it works a bit differently. Due to the way parity works, if you have three drives, the available space will be equal to a RAID 0 array with two drives. In our examples, we used three 120GB SSDs, which resulted in arrays with 240GB of space.
If you want install an OS on top of a RAID array, RAID 5 will work fairly well, so long as you’re not trying to use it atop an array of multi-terabyte spinning drives. RAID 5 offers more resiliency than RAID 0, as well as significant gains in read operations for loading programs and games.
By now you already know that it’s always best to use drives of identical make, model, and capacity when constructing a RAID array. Even if you’re forced to use different makes and models (as we were in our examples), you have to make sure that the drive capacities are identical. Mixing drives will at best result in an array that will perform as if each drive were the slowest one.
When connecting your drives for use in RAID, be sure to use the same interface for the drive. If two drives in your array are using SATA 6Gbps, use the same interface for every other drive you intend to add to the array.
It’s also a good idea to make sure all of the drives in your array are using the latest firmware. Firmware fixes can result in better speeds and fix potential bugs that can wreak havoc on your data.
CREATING ON WINDOWS
Creating a RAID 5 array in Windows is just as easy as creating RAID 0 and 1 arrays. It’s important to remember Microsoft uses the name “Storage Spaces” instead of RAID, but the function is pretty much the same. To start, hit Win + S and search for “Storage spaces” and launch the utility. Next, click “create a new pool and storage space.” You’ll be prompted for administrator access. Click yes to continue. You’ll see a window showing all of the unformatted disks that can be used. Select all the disks you want in the array and click “Create pool.” You’ll have to select at least three to be able to create a RAID 5 array. Next, give the pool a name and drive letter. The name will appear as the drive label. Select NTFS as the file system. For Resiliency type, select “Parity,” which is the equivalent to RAID 5? When you’re ready, click Create storage space to create the array. If you want to remove a RAID array for any reason, simply click Delete next to the storage space you want to remove. To remove the pool, remove all of the storage spaces in it first.
CREATING ON LINUX
Creating a software RAID 5 array in Linux takes only two terminal commands. In Linux, the program mdadm (we like to pronounce it “madam”) is what we’ll use to set up the array.
First things first, you need to get the RAID software. You’ll need to download and install mdadm from your software repository. It’s pretty common, and is included in most software repos. In Ubuntu, type the following command: sudo apt-get install mdadm
The command will install mdadm for you, along with a dependency called Postfix. Postfix is an SMTP service that sends emails. The reason it’s included is because if a drive fails or something else happens to your array, the system can alert you with an email. That’s great for IT administrators, but Postfix is a PITA to administer. In many cases, you can just set the program to use no configuration if you like. If you do take the time to set it up, it can give you early warning when drives fail.
Once mdadm is all set up, all you need to do is use the following command: sudo mdadm –create /dev/mdX –level=5 –raid-devices=[number of drives (3 or more)] [drive name] [drive name] [drive name] [etc]
The above command will vary based on the size of your array, and how you’d like to name it. RAID devices are generally named /dev/md X where X is the index of the array. Drive names can be any valid Linux device path, e.g., /dev/sda or /dev/disk/by-uuid/[UUID] .
If you’re not sure how Linux has identified your drives, you can use lsblk to identify them:
lsblk -o name,model,mountpoint,size
Once you create your array, you’ll have to wait while the drives synchronize, which may take several minutes.
You can also create RAID arrays in Linux using the GNOME disk utility. In Ubuntu, search for “Disks” and open the utility. On the left side of the window, click the checkbox above the list of drives. Then, select the drives you want to use to create an array and click Create RAID.


