HOW TO SETUP RAID 0
HOW TO SETUP RAID 0
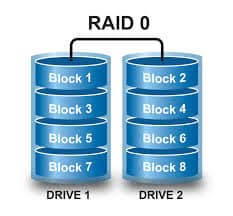
RAID has several “levels” that use drives in different ways. Level 0 (RAID 0) spreads or “stripes” data between two or more drives. The problem with striping data across drives is that when things go wrong, they go really wrong: If a single hard drive in a RAID 0 array fails and cannot be recovered, the entire RAID array is lost. On the plus side, RAID 0 combines the drives into a single larger logical drive with a capacity that is the sum of all the drives in the array.
There are three ways to implement RAID: hardware, software, and Fake RAID. Hardware RAID is faster, but it’s also more expensive due to the need for specialized hardware. Software and Fake RAID use the CPU in lieu of a dedicated RAID chip.
Creating a software RAID array in operating system software is the easiest way to go. Windows 8 comes with everything you need to use software RAID, while the Linux package “mdadm” is listed in most standard repositories.
The problem with software RAID is that it only exists in the OS it was created in. Linux can’t see a RAID array created in Windows and vice versa. If you’re dual booting both Linux and Windows and need access to the array from both operating systems, use Fake RAID. Otherwise, stick to software.
In this article we’ll focus on Software RAID:
To ensure the best RAID performance, use identical drives with the same firmware. Mixing drive makes and models may work, but will result in faster drives being slowed down to match the slowest drive in the array. Don’t mix SSDs and mechanical drives in a RAID array; the SSD is faster on its own.
RAID 0 doesn’t protect you from drive failure, so use new drives whenever possible. When connecting your drives, make sure they’re all using the same SATA version as well.
Before a drive can be used in a RAID array, it must be clear of file systems and partitions. If you’re using old drives, make sure you get everything of value off of them first. You can remove any partitions with Disk Management on Windows or “gparted” on Linux. If you’re using Fake RAID, the motherboard’s RAID utility should warn you before it wipes partition tables and the file systems on them.
In your operating system, you’ll need to have elevated permissions to create a RAID array. For Windows, you’ll need to be an Administrator. In Linux, you’ll need either the root password or sudo access.
If you want to use Fake RAID, make sure your motherboard supports it. Be warned though: Installing an OS on top of a RAID 0 array can be really risky if your system data is critical.
CREATING RAID ON WINDOWS
Creating a software RAID 0 array on Windows is really easy. The thing is, Microsoft doesn’t call it RAID in Windows 8, opting for “storage spaces” and “storage pools” instead.
Hit Win + S and search for “storage spaces” and open the utility. Next, click Create a new pool and storage space. You’ll be prompted for administrator access. Click Yes to continue.
Windows 8’s built-in RAID software goes by the name “Storage Spaces.”
A window showing all the unformatted disks that can be used will pop up on the screen. Select all the disks you want in the array and click Create pool.
Next, give the pool a name and drive letter. The name will appear as the drive label. Select NTFS as the file system. For Resiliency type, select Simple (no resiliency. This is the equivalent to RAID0.When you’re ready, click Create storage space to create the array.
While a simple storage space technically only requires one hard disk, you need at least two for it to be a true RAID setup.
If you want to remove a RAID array for any reason, simply click Delete next to the storage space you want to remove. To remove the pool, remove all of the storage spaces in it first.
When you’re done, you’ll be able to manage your storage spaces, check capacity, and monitor usage.
CREATING RAID ON LINUX
Creating a software RAID in Linux is faster than Windows because it only requires a couple of console commands. First, you need to download and install mdadm from your package manager. In Ubuntu, use aptitude to install the program:
sudo apt-get install mdadm
Once mdadm is installed, you can create your array by typing the following command as root or using sudo:
mdadm –create /dev/mdX –level=0 –raid-devices=[number of drives] [drive name] [drive name] [etc]
The above command will vary based on the size of your array, and how you’d like to name it. RAID devices are generally named /dev/mdX where X is the index of the array. Drive names must be valid Linux device paths, e.g., /dev/sda or /dev/disk/by-uuid/[UUID] . In our example, we used the following:
mdadm –create /dev/md0 –level=0 –raid-devices=2 /dev/sda /dev/sdb
To take apart the RAID array, use the following commands:
umount -l /dev/mdX
mdadm –stop /dev/mdX
sudo mdadm –zero-superblock /dev/sdX
sudo mdadm –zero-superblock /dev/sdY
Contact Data Recovery Experts in case of failure


